Maya 2020 is a wonderful 3D animation and photo realistic rendering software that can do wonders in the field of animation creation. You can create animations for games as well as cartoons that will look like real. With the powerful rendering capabilities you can create realistic environments using the realtime images and 3D graphics. The Standalone and free download maya 2020 is available for all the operating system and is supported by 32 Bit as well 64 Bit operating system. If you are looking for a powerful 3D Photo making and rendering tool then you should defenitely check it out. Let’s dive in and explore some amazing hidden features in the software.
Technical Info about Maya 2020 Offline Download:
- Software Full Name: Autodesk Maya 2020
- Setup File Name: Autodesk_Maya_2020_Winx64.zip
- Developers: Autodesk
- Full Setup Size: 1.9 GB
- Also, Setup Type: Offline Installer / Full Standalone Setup
- Compatibility Architecture: 64 Bit (x64)
- Also, Latest Version Release Added On: 12th Dec 2019
Complete Overview of Maya 2020 Version Offline Edition:
Have you tried Maya or any other 3D Rendering software, if yes, then you will feel the difference among them and Maya 2020. Because with enormous amount of options and features you are capable to create some amazing scenes for your cartoons and other animations. Also, you can make the photo realistic designs with this software so that you can use those in your games and other possible projects. Colors are represented by three: a red, green and blue value, also known as RGB to get something like that. I’ll, hit tab again and create a value node. Now a value node defaults to float or decimals, but I can use it to store any type of value just by clicking this button next to type.
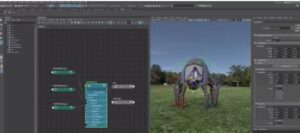
Bifrost Feature:
The Bifrost Graph is a brand new plug-in that supports Maya, 2018 2019 and onward. It’s, a portable visual node-based way to design build and test custom behavior. That includes FX, but with the potential for much much more. Bifrost Graph is a node-based system.. A node graph for those who might not know is a series of individual pieces, ( called nodes ) that move and manipulate information from one scene element to another.
For a more detailed primer on node graph basics click. The link at the top of your screen., Starting from the Node Editor, the workflow to view and edit a Bifrost graph, is similar to viewing and editing a shader. At a high level. Each is represented as a single node., But both also have their own editors for digging into them in more detail. To create a new Bifrost Graph, just go up to Create & gt, Bifrost Graph. As expected, this creates a new bifrostGraph node and opens the Bifrost Graph Editor.. Now remember. Although the Bifrost Graph, Editor and Node Editor look kind of similar, they aren’t the same. In the Node Editor, a Bifrost graph is represented by a single node.
There’s, a number of different input and output plugs here. To get a sense of what each of them are for. I can always go to the Info tab here on the right.. This is your go-to spot for help on each node, so use it frequently. This is a great debugging tool that allows me to compare and contrast info., For example. This one shows me the info coming out of my Change_Color compound.. Let’s. Compare that to the wire that’s, bypassing the compound. Notice that one clearly has a color property, while the other does not. Just note that Watch Points only work properly when connected to an active output. If nothing was being fed through the output.
The Menu Bar and Shelves:
menu bar, which is probably easy to understand if you’ve used almost any other software before. In here, you’ll find almost all of Maya’s tools and commands neatly arranged from general stuff, like Opening and Saving files to Undoing or Redoing edits to more specific task-based commands. Something a little more unique to Maya is that you can change the task-based menus that appear here via this dropdown box.. Each of these menu sets is designed to cater to the specific needs of each of these workflows.
So you’ll want to set this based on what you plan on doing next. Additionally, shortcuts to many of the most useful commands can be found here in the shelf represented by these colorful icons. So, for example, clicking the basic cube icon here, creates a cube in my scene – exactly as choosing Create & gt, Polygon, Primitives & gt Cube would have. Also, try AutoDesk Maya 2017 For Free
Shelves are also organized by discipline except they’re, even more specific., For example, Curves/Surfaces Poly, Modeling and Sculpting can all be considered. “Modeling” tasks., However, shelves don’t change automatically with your Menu Sets, making it possible to use an FX menu set with a modeling shelf. If you’re unsure what an icon means you can hover over it and check down here in the Help. Line… …or just wait for the tool-tip to appear right on the mouse cursor.. Both the Help Line and Tooltips are extremely useful. So I recommend keeping an eye on them, at least until you’re comfortable with all of Maya’s bells and whistles.. Finally, there’s the Status Line, nestled right in between the menus and shelves.
Mode:
Object mode is for selecting an entire object at once, while component mode is for selecting smaller sub-parts of that object. This’ll be important later when we start playing around with position and shape. The last thing I’ll say here is that you can use F8 to swap between the two as well.. Moving on this, entire middle section of the UI is dedicated to viewing and interacting with objects in the Viewport. To navigate the Viewport hold the Alt key, while dragging any of the mouse buttons.. You can also press F to automatically frame a selected object or A to frame everything in the scene, regardless of selection. Also, try AutoDesk Maya 2013 For Free
Panel Toolbar:
The Panel Toolbar and menu give access to all kinds of view: options like Wireframe, vs, Shaded views, lights, shadows, smoothing and other Viewport-specific quality settings.. You can also hold the right mouse button over objects to bring up the marking menu, which contains shortcuts to all sorts of things you can do to that. Also, try AutoDesk Maya 2015 For Free
Character Controls:
These are specifically for creating animatable skeletons. You probably won’t want to fool around with this one. Until you’re more comfortable in Maya., Finally, this brings us to these two strips at the bottom. The first two deal entirely with animation. like the Time Slider and playback controls, which are likely familiar to anyone who’s used a video player before. From here. You can play stop rewind and manually scrub through time. It’s important to note that Maya measures time in frames, though not seconds., The default frame rate equates 24 frames with one second of playback., So these 120 frames actually represent only 5 realtime seconds of footage.
Some Amazing Features in Maya 2020 Offline Download:
- Having a new menu bar with bunch of new options.
- Make realistic designs and animations.
- An imposing as well as a powerful application that allows you to create some very impressive environments.
- Shelves are designed nicely and have more options.
- Some new modes are added.
- Having some new vectors.
- The whole interface contains loads of buttons and toolbars.
- Start the project from scratch.